.png?width=280&height=39&name=Projectworks-Logo-Black-280px%20(1).png)
- Step 1: Choose Document or Presentation for your proposal
- Step 2: Set the page background color
- Step 3: Design a strong cover page
- Step 4: Design headers and footers
- Step 5: Structure your content
- Step 6: Add visual emphasis
- Step 7: Add a signature and a closing page
- How to save your design in a template
- Before you send: a quick checklist
Step 1: Choose Document or Presentation for your proposal
- In your proposal, click Document Settings.
- In Orientation, choose between:
-
document (portrait, reads like a report)
- presentation (landscape, reads like a slide deck).
-


Decide on the orientation you want for your proposal and set it before you start adding in your content. Switching later reflows everything, so it's easier to design for the shape from the start.
Step 2: Set the page background color
- Go to Document Settings → Page styling → Background color
- Select a color to be the background.
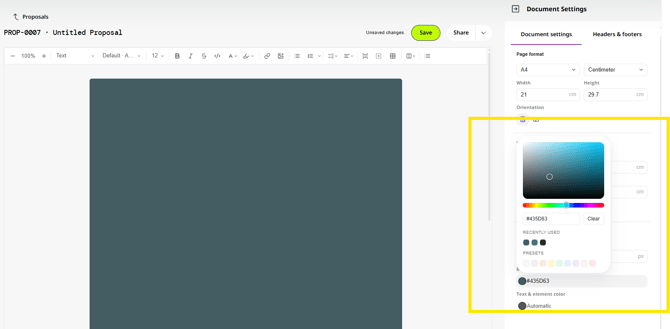
On a dark background, set your body text to a light color (white or near-white). Aim for strong contrast so the text stays easy to read.
Step 3: Design a strong cover page
- Insert a
- Logo
Click “Insert Picture” in the formatting toolbar to upload an image of your logo.
- Title
- Short Tagline
- Prepared for / by / date
You can use Variables to ensure consistency across your proposal
See How to use Variables →
- Logo

Step 4: Design headers and footers
Use a 3-column table
- Click the Table logo in the formatting toolbar and insert a 3×1 table (three columns, one row) into the header.
- Drop content into each cell.
For example, a logo on one side and a title or page number on the other.
Tables in headers and footers have no border automatically, so the layout stays invisible.
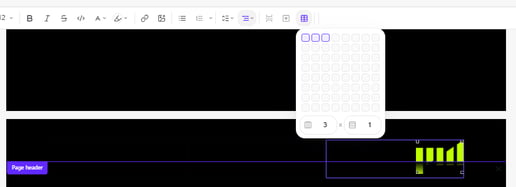
Do the same in the footer for a page number, a confidentiality note, or a call to action. For the full header and footer controls, see How to manage formatting and layout settings of your proposal →
Add page numbers in the footer
- Click into the footer, then on the Headers & footers tab use the Page numbers quick-insert.
- Click Insert page number to add the current page ({page}).
- Type "of" yourself. The word "of" isn't inserted for you.
- Click Insert total pages to add the total ({pages}).

The result reads {page} of {pages} and shows as "1 of 7" on the page. Centre it in the footer, or drop it into a footer table cell, for a tidy result.
Step 5: Structure your content
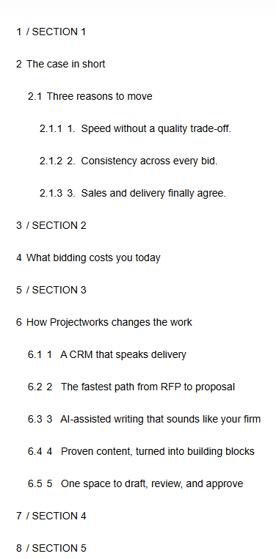
Structure with headings to create your outline
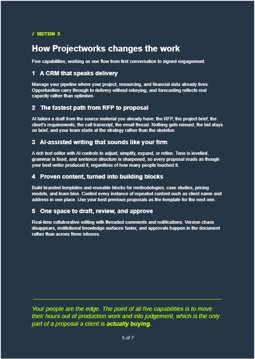
- Use the style dropdown to make your section titles real headings (Heading 1, Heading 2, and so on) rather than just big bold text. This builds the Outline automatically.
Add clean dividers with a line of dashes
- For a rule between blocks, type a run of em dashes (————————) across the line.
- To turn it into a coloured bar, select the dashes and apply a highlight (or a text colour). This creates a divider without using an image.
Step 6: Add visual emphasis
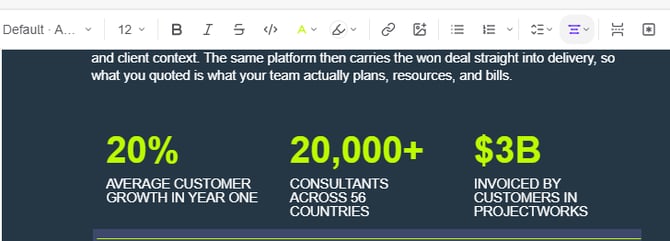
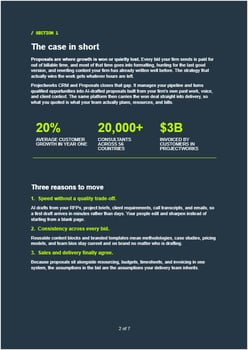
1. Create emphasis: stats, accent colour, and quotes
Here are some ideas you can use for visual emphasis:
- Big stat callouts A large heading-sized number in the accent colour with a small label beneath. Three can be placed side by side in a row.
- Accent colour and strikethrough Colour a key phrase, or strike through a word.
- Pull quotes Set a testimonial in italics with a left border, or give it a whole slide.
.png?width=262&height=370&name=image-20260811-043140%20(1).png)
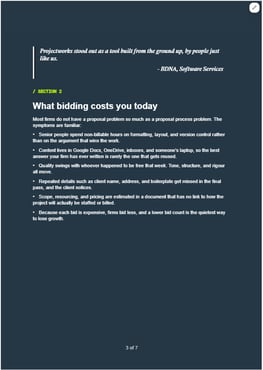
2. Lay out information with tables
Tables can also be used outside of pricing.
For example, a comparison table such as "what happens" versus "what you gain."
.png?width=279&height=394&name=image-20260811-043359%20(1).png)
For pricing, use a Pricing table, When you win the deal, its lines can seed a project budget. See What is Seeding? →
3. Add images
Images that can be added include a cover graphic, a product shot, or a photo beside "why choose us" points. Keep them aligned to your text and consistent in size. In a header or footer, place the image inside a table cell (see "Use a 3-column table" above).

Step 7: Add a signature and a closing page
Close the proposal with a signature block so it can be accepted, then a short thank-you or call-to-action page.
- Add a Signature Block so your client can sign in the customer portal.
See How to use System Blocks in your proposal →
-
Add a closing “Thank you” page.

How to save your design in a template
If you want to re-use this design for future proposals, you can save your work as a template so you can start from this same design instead of a blank page.
- Save your proposal.
- Click into the Proposals tab to see a list of your proposals.
- Click the ⋮ menu at the end of a proposal’s row.
- Click "Save as Template" to save the proposal as a template.
Read more about how to create templates →
Personalise with variables: Use variables like Customer_Name so names and details fill in automatically and never get missed.
Before you send: a quick checklist
- Background colour set, with light text for contrast.
- Section titles use Heading styles.
- Header/footer laid out with a borderless table; page numbers added if you want them.
- Dividers, stat callouts, and accent colour used consistently.
- All variables filled (no stray Customer_Name placeholders).
- Signature block in place; closing page added.
- Preview or export to Word to check the formatting, then share the secure link.
See How to share and export a proposal →