Contents:
- Before you begin
- Creating a project schedule
- Maintaining a project schedule
- Bulk editing of timecodes on the project schedule
- Creating a Finish-to-Start dependency
- Publish to Resourcing
- Publish to Forecast
- FAQ/Troubleshooting
- Error Messages
Before you begin:
-
In System Settings, “Enable the project schedule” must be set to TRUE. If you don’t have access to check or adjust this in System Settings, consult your System Administrator.
-
To create and maintain a project’s schedule, you will need the appropriate access.
Creating a project schedule:
-
Create a project that has at least 1 time-based budget with at least 1 timecode.
-
Configure the timecode settings
-
Toggle ON “Timecode is available on schedule”
-
Input Start Date and End Date
-
Select a Status (Defaults to “To Do”)
-
Input a Progress % (Optional)
-
Click Update Timecode
-
-
Click on the Schedule tab within your Project
-
Adjust the timeline view to Daily, Weekly, Monthly, Half-year or Yearly as needed.
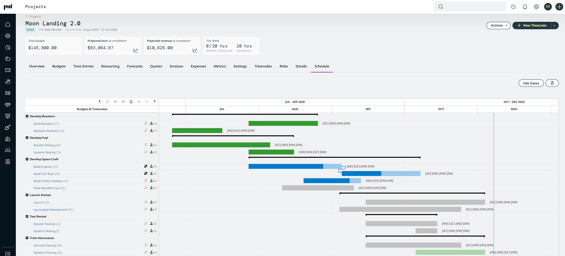
Maintaining a project schedule
-
The Status of the Timecode is color-coded on the schedule.
Green = Done
Blue = In Progress
Grey = To-Do -
The % progress value is represented in a bolder-colored segment of timecode’s time bar.
-
The timecode dates can be adjusted by clicking and dragging the timecodes bar
Bulk editing dates of timecodes on the schedule
On the Schedule tab - click “Edit Dates” for a bulk interface to easily adjust the start and end dates of all the timecodes on the schedule.
You can also adjust the “Timecode is available on schedule” to bulk add other project timecodes to the schedule.

Creating a Finish-to-Start dependency:
Link two timecodes via a Finish-to-Start dependency to mandate that Timecode B cannot start until Timecode A has been completed.
-
Enable “Auto-Schedule” for the timecodes by clicking the Magic Wand icon next to the timecode.
-
Hover over a timecode’s progress bar until you see the white circles on each end.
-
Click on the white circle at the end of a timecode, and drag the dotted to the beginning of another timecode.
-
This will create an arrow that shows the dependency between the 2 timecodes.
-
Because you have the Auto-Schedule enabled, if you shift timecode A earlier or later, it will automatically adjust the start and end date of Timecode B accordingly.
-
To delete the dependency, click on the arrow and press the delete button on your keyboard.
Publishing Schedule info to Resourcing
You can publish your project’s Schedule directly to Resourcing with a single click.
What is Publish-to-Resourcing?
This feature allows you to push information from your project schedule directly to resourcing tab - by taking the Timecodes' Allocated Hours within their Start Date and End date into the Resourcing module, automatically generating or updating your Resource Plan.
Publish-to-Resourcing looks at
-
People assigned to timecodes in your schedule (People only, Placeholders are not supported).
-
Their quantity of allocated hours.
-
The Start Dates and End Dates of the timecodes.
and pushes this information to your project’s Resourcing tab.
Learn more about resourcing here: Overview of Resourcing.
Example
On the Project Schedule Jack is allocated 20 hours on a timecode that has a Start Date of July 1 2026 and an End Date of July 10 2026. Clicking "Publish will push Jack's hours to the project’s Resourcing tab by intelligently distributing his 20 hours across that date range on a daily granularity (accounting for public holidays and leave on Jack’s calendar). If Jack has allocated hours for more than one timecode on the schedule, it will also take these into account, as well as all other people with allocated hours on the schedule.
To use this feature you'll need
-
To have Created a Project Schedule on your project.
-
Permissions to Maintain Resourcing (at least your own).
How to use Publish-to-Resourcing to push your Schedule info to your project's resourcing
-
Go to your Project and open the Schedule tab.
-
If you have:
-
Permissions to Maintain Resourcing (at least your own)
and -
At least one Timecode available on the Schedule
then you’ll see the “Publish to Resourcing” button.
-
-
Click Publish to Resourcing — the system will display how many people it can publish to Resourcing based on your permissions and the schedule data.
-
Choose if you’d like the Resourcing to be Confirmed (committed and finalised) or Pencilled (tentative and subject to change).
-
Go to your project’s Resourcing tab to view the hours published from your Schedule.

How it works:
- Publish-To-Resourcing overwrites future resourcing for people who have allocated hours in the schedule.
- Publish-To-Resourcing only affects future resourcing, historical resourcing is not changed.
- People with no allocated hours, or who aren’t included in the schedule, won’t be changed.
- To remove unneeded resources, manually delete them in Project’s Resourcing tab using the “⋯” menu next to their names.
- You won’t see Timecode-level granularity in your resourcing plan, the hours published will automatically roll up into the Project Level or Budget Level depending on how your resourcing is set for that project.
ℹ️ Performance Note:
The “Publish to Resourcing” action can take some time to complete — especially for larger projects. For example, publishing a schedule of 15 Timecodes with 5 users each can take approximately 30 seconds, depending on the range between Start and End Dates. Please be patient while the system processes your request — you’ll see confirmation once the publish is complete.”
Publishing Schedule info to Forecasts
You can update your project’s forecasting by pushing information through from your project schedule.
What is Publish-to-Forecasts?
This feature allows you to push information from your project schedule to the Forecasts tab - by calculating forecast information via the Timecodes' Allocated Hours and Billable Rates within their Start Date and End date.
Publish-to-Forecasts looks at the
-
Quantity of hours allocated to timecodes in your schedule.
-
Billable rates of people and placeholders that are allocated.
-
The Start Dates and End Dates of the timecodes.
and pushes this information to your project’s Forecasts tab.
Learn more about forecasting here - Adding a Revenue Forecast
For example:
On the project schedule, John Smith is allocated 40 hours at $100 per hour to a timecode in Budget A between 1 July 2026 - 31 August 2026 → publishing to forecasting will result in $4000 forecasted for Budget A, split over July and August.
To use this feature you'll need
- To have Created a Project Schedule on your project.
and -
Permissions to Maintain Forecasts.
How to use Publish-to-Forecasts to push your Schedule info to your project's forecast
- Go to your Project and open the Schedule tab.
- If you have:
- Permissions to Maintain Forecasts, and
- At least one Timecode with Schedule info
- You’ll see the “Publish to Forecasts” button appear.
- Click the button — the system will display what it can publish to forecast based on your permissions and the schedule data.
- Publishing will affect historical forecasts up to the Historical months specified in the Settings>Forecasts>Edit Historical months property.

-
Non Billable projects are not supported.
-
Only active budgets are updated; inactive budgets are skipped and clearly indicated.
FAQ/Troubleshooting
Why can’t I see my timecodes on the schedule?
For a timecode to appear on the schedule, you must
-
Toggle ON “Timecode is available on schedule”
-
Input Start Date and End Date
-
Select a Status (defaults to “To Do”)
-
Input a Progress % (Optional)
Can I customize the Status drop-down options?
No. You can create custom fields against timecodes with your own drop-down options, but these will not pull through to the Schedule view.
Can I see the schedule for multiple projects at once?
No, the schedule is only available at a single project level.
Error Messages
You may open the project schedule tab and see the messages below prompting you to complete your schedule setup.
"No Budgets of time type yet
Time Budgets are required before scheduling.
Go to Project → Budgets"
- Your project doesn’t yet have any time-based budgets. You can read more about setting those up here Setting up Budgets.
"No timecodes yet
Timecodes are required before scheduling.
Go to Project → Timecodes"
- Your project doesn’t yet have any timecodes. You can read more about setting those up here Setting up Timecodes.
"No schedule yet
1 timecode needs scheduling info.
Edit Dates"
- The timecodes in your project have not been configured for the schedule. See Creating a Schedule.