Before you get started:
From a structural perspective, timecodes must be added under time budgets. This will ensure that any logged time entries are accurately tracked against the correct budget.
Please note: Timecodes are only available for time budgets, you will not be able to add them to expense budget lines.
In this article, you will learn about:
Creating timecodes:
In Projectworks, you will create timecodes which is what your team will see when they are entering their timesheets. How you set up your timecodes will depend on your business and project structure, you can choose to keep these as broad or detailed as you like.
In this particular example, a person would log their time against ‘Sprint 1’:

Alternatively, you also have the choice of breaking up timecodes to show more granularity. For example, this could represent specific tasks on the project as different timecodes. If you choose to do this, we recommend staying under 15 timecodes per budget line.
In this particular example, a person would log time against various the timecodes within ‘Sprint 1’ - such as 3 hours in Design, 2 hours in Internal Meetings, 1 hour in Reporting, and etc.

You can create timecodes in three ways:
-
While setting up your project budget – add timecodes as you build the budget. See Setting up Budgets (project pricing).
-
Independently on the project – go to Project → Timecodes to create or edit timecodes at any time.
-
By cloning an existing project – cloning copies the project’s timecodes (and budget structure) into the new project. See Creating and cloning projects.
When setting up your timecodes, there are a few additional settings you can choose to turn on:
-
Restrict time entries by date: this will make timecodes searchable and selectable within the given time frame. This is great if you know the time restraints of your project.

- Make time entry comments mandatory: this will make time entry comments mandatory for anyone who is logging time against this project.

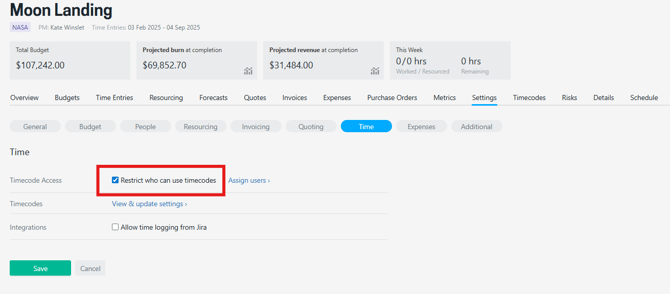
- Related to timecodes set up, you can set up your project to restrict who can use timecodes: turning this on means only those assigned to the project are able to log time against these timecodes.
Maintaining timecodes:
You can always create and edit timecodes in your Project through the ‘Timecodes’ tab
When creating a new timecode, you must always have this associated with a budget. You’ll also have a few other options to configure your timecode. This includes:
-
Billable or Non-billable
-
Timecode Type
-
Timecode is available on the schedule
-
Set a default rate (this may be helpful if your timecode type is on call or call out)
Assigning people to timecodes:
You can assign people to timecodes and set allocated hours. You may want to do this to:
-
Communicate to your team the total number of hours they will have available for a particular timecode
-
Report on whether timecodes (or parts of a project) are tracking to the allocated hours
-
When entering timesheets, they can see how many hours they have remaining on a timecode
-
Prevent people from exceeding their allocated hours for a timecode when doing their timesheet (this setting will need to be turned on by a system admin)
To assign people to a timecode, click on the timecode and go to the ‘People & Rates' tab. You can then add a person or placeholder and set their allocated hours:

Inactive timecodes:
You can choose to make timecodes inactive if you no longer want people logging time against it. This is often used as a project progresses, especially when working in sprints.
When you make a timecode inactive, it will:
-
No longer appear as an option for new timesheets
-
Be hidden from view when in the timecodes tab (unless you tick ‘Show inactive timecodes’ checkbox)
-
Inactive timecodes will still contribute to project metrics