.png?width=280&height=39&name=Projectworks-Logo-Black-280px%20(1).png)
Before you can connect Sage Intacct with Projectworks you need to;
- Have the authorized Projectworks Sender ID to use in the Web Services in Sage Intacct.
- Have created a Web Services user with the necessary Permissions in Sage Intacct.
- Setup in Sage Intacct
- Step 1: Subscribe to Web Services and add Projectworks' Sender ID to the allowed list
- Step 2: Create a new Web Services role in Sage Intacct
- Step 3: Configure the role
- Step 4: Create a new Web Services user and assign the new role
- Step 5: Add Projectworks Sender ID into Sage Intacct
- Step 6: Connect the systems in Projectworks
Setup in Sage Intacct
Follow the below steps in your Sage Intacct account to prepare it for connecting with Projectworks, and then finish by establishing the connection. By following these steps you will
- Setup your Sage Intacct to be integrated with Projectworks
- Establish the initial connection between your Sage Intacct and Projectworks, ready for further configuration.
Step 1 - Subscribe to Web Services and add Projectworks' Sender ID to the allowed list
The First step is to give Projectworks Sender ID permission to use Web Services in Sage Intacct. This authorization allows Projectworks to connect to and interact with your Sage Intacct instance.
- Start by subscribing to Web Services, by going to Company → Admin tab → Subscriptions
- Scroll down to Web Services and enable the toggle to subscribe.

- Then go to Company -> Setup tab -> Company to access the Company information
- Click Edit in the top right corner
- Go to the Security section
- Scroll down to the Web Services authorizations section
- Click Add and enter Projectworks' Sender ID: ProjectworksMPP.
- Save the Sender ID.
Step 2 - Create a new Web Services role in Sage Intacct
As a second step, you have to create a Web Services role in Sage Intacct.
This Web Services user is used solely for integration purposes. It exchanges information programmatically with Sage Intacct via Web Services API calls. It isn’t allowed to log into the user interface. You can read more about the purpose and the management of Web Services users on Sage Intacct’s website from here →
To obtain the Web Services user ID for the integration, you need to:
- Create a new role with the required permissions
- Create a new Web Services user and link it with that role
To create a new role:
- Go to Company > Admin tab > Roles.
- Add a new role and give it a name; for example: Web Services user – Projectworks.
This is the name that will appear as the actor for actions initiated by the integration, for example any invoices created by exporting an invoice from Projectworks to Sage Intacct will be under this name.
Step 3 - Configure the role
Next, you will be asked to subscribe the role to modules and applications.
Subscribe the role to the following modules and give it the respective permissions:
For Invoice Integration
- Company
- Entities > View
- Departments > View
- Inventory Control
- Item > View
- Units of Measure > View
- Order Entry
- Tax Detail > View
- Order Entry transaction definitions > View
- Order Entry transactions > Add
- General Ledger
- Accounts > View
- Accounts Receivable
- Invoice > View, Add
- Adjustments > View, Add
- Manage payments > View
- Customers > View, Add
For Expense Integration
- Accounts Payable
- Vendors > View, Add
- Bills > View, Add
You can control the permissions for each module by clicking on the Permissions link.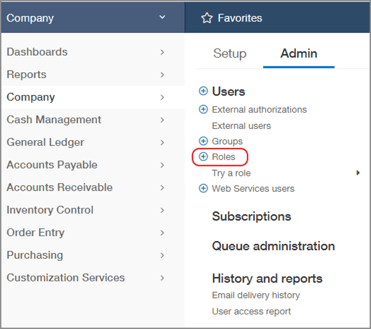
Once you’re done, save the changes.
Step 4 - Create a new Web Services user and assign the new role
Next, you need to create a new Web Services user and assign it to a role you just created.
- Go to Company > Admin tab > Web Services Users.
- Add a new user and fill in the following fields:
- User ID
- Last name
- First name
- Email address
- User type: Business
- Admin privileges: Limited
- Click on the Roles Information tab and select the role you created in the previous step.
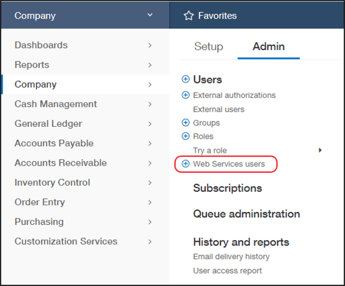
- Save the changes.
You can read more about creating a Web Services user from here. on Sage Intacct’s website here →
After creating the Web Services user, you will receive an email from Sage Intacct with the following credentials:
- Password
- Sage Intacct Company ID
- User ID
Please save this information as you will need it to connect Sage Intacct with Projectworks.
For the final two steps you will need to login to your Projectworks account.
Step 5 - Add Projectworks Sender ID into Sage Intacct
Next, you need to authorize Projectworks to use those Sage Intacct Web Services by adding Projectworks' Sender ID to the Web Services authorizations list:
- In Projectworks navigate to Settings → Admin → Integrations - Accounting → Sage Intacct.
- Copy the Projectworks ClientID from the screen.
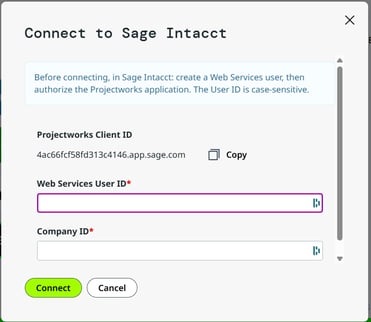
- Then, in Sage Intacct, navigate to Company → Company Info → Edit → Security → Authorized Client Applications and select Add.
- Enter the Client ID you copied from Projectworks & the Web Services User ID (this is case-sensitive, enter it exactly as it was created.)
Step 6 - Connect the systems in Projectworks
- In Projectworks, navigate to the Settings → Integrations > Accounting → Sage Intacct
- Enter the Web User ID and your Sage Intacct Company ID and click ‘Connect’
Your Sage Intacct are Projectworks accounts are now connected.
Proceed to How to configure Sage Intacct integration in Projectworks → to finish the setup and configuration process.